Workspaces
A workspace is a cloud development environment that runs inside a project. It opens a browser-based IDE, comes with your project's files and data already mounted, and can be sized from a single CPU up to multi-GPU machines. You start it when you need it and stop it when you don't, and your work persists in between.
Every workspace has:
- An IDE you work in (Jupyter Lab, VS Code, RStudio, or your own custom IDE).
- Compute you choose (CPU, memory, optional GPU, and an optional distributed cluster).
- Storage that survives stop/start (see Storage in a workspace).
- Services wired in for you (add-ons, data sources, AI models, ML models, workflows, feature stores and agents).
Choosing an IDE
When you create a workspace you pick one of four IDE tiles. The IDE is independent of the hardware you choose, so you can run any IDE on any size machine.
| IDE | Best for | Opens on |
|---|---|---|
| Jupyter Lab | Data science, notebooks, interactive Python or R | Notebook interface |
| VS Code | Full-stack development, debugging, multi-file projects | VS Code in the browser |
| RStudio | R analysis and statistics, Shiny, R Markdown | RStudio Server |
| Custom IDE | Any other browser-based IDE you supply | Your image's own IDE |
Whichever you pick, the workspace opens in your browser with your project files and data already mounted. No local install and no SSH is required.
Jupyter Lab
The default choice for data science and machine learning. You get a full Jupyter Lab interface with a Python kernel, a terminal, a file browser, and git and notebook-diff panels. The file browser starts in your project's volume (/volumes/local/<name>), showing its code/ and data/ folders; it is rooted at /, so you can go up to every mounted volume under /volumes and to /workspace. It has the same Python and libraries as the compute clusters, so a notebook connects to a cluster with nothing to install. For R, use RStudio.
VS Code
A full VS Code editor in the browser, with the integrated terminal, source control view, and the extension marketplace. Good for building applications, editing many files at once, and debugging. Its explorer is rooted at /, as Jupyter's file browser is: your project's volume is at /volumes/local/<name> (its code/ and data/ folders), shared volumes are under /volumes/shared (their code read-only), and /workspace is beside them. Source Control lists your project volume's code/ repository, the code you write here.
RStudio
A first-class RStudio Server environment for R users. You get the familiar RStudio panes (console, editor, environment, plots) with R ready to go, so you can run scripts, build Shiny apps, and knit R Markdown without any setup. R sessions start in your project's code/ folder, so paths in your scripts are relative to it; your data is at ../data/. To add specific R packages, select a saved custom environment built on an RStudio image; the base RStudio tile gives you a working R IDE out of the box.
Custom IDE
Bring your own browser-based IDE. Select the Custom IDE tile, choose a saved environment whose image serves an IDE, and tell the platform which port that IDE listens on (default 8888). The platform proxies your browser to that port and opens it like any other workspace. The platform starts the image as it was built (its own CMD/entrypoint) and adds nothing to it, so the image must serve its IDE on that port, listening on all interfaces. Requests reach the IDE at its root (/).
Some IDEs build absolute links and need to know they are running behind a subpath. If yours does, declare one or more proxy headers on the Custom IDE tile as name / value pairs. Values may use these placeholders, which the platform fills in for each request:
| Placeholder | Becomes |
|---|---|
${BASE_PATH} | The subpath your workspace is served under |
${ORIGIN} | The scheme and host (for example https://dev.strongly.ai) |
${PATH} | The request path |
${REQUEST_URI} | The full request path and query string |
Cookies your IDE sets are relayed automatically, so you only need proxy headers when your IDE specifically requires a header to generate correct links.
The built-in coding assistants are available for Jupyter Lab and VS Code. RStudio and Custom IDE run their own IDE, so they don't inject the assistant CLIs.
Creating a workspace
- Open your project and click Launch Workspace.
- Enter a Name and Description.
- Pick an IDE tile (above). For Custom IDE, set the port; for RStudio or Custom, optionally choose a custom-environment image.
- Set your resources (see below), or select a saved environment to supply both the image and the sizing.
- On the Volumes tab, set the size of
/workspaceand choose any shared volumes to mount (none unless chosen). - Optionally attach services, environment variables, coding assistants, and a compute cluster.
- Click Launch Workspace. The workspace is created and starts straight away: its page shows Starting, then Running, at which point View opens the IDE.
The first start prepares the workspace before the IDE opens: it installs git and the Strongly SDK when the image lacks them, the coding assistants you chose, and Jupyter Lab on an image that does not include it. On a small size this can take several minutes; the status stays Starting until the IDE is up, and the Logs tab shows each step as it happens.
Environments (image + sizing)
You can size a workspace in one of two ways:
- Custom resources -- set CPU, memory, disk, and optional GPU directly.
- A saved environment -- select an environment from your library that supplies a container image and its size. This is how you get a specific software stack (for example an RStudio image with your R packages, or a CUDA image for training). You can pin a specific version of the environment, or use the latest.
The workspace runs at exactly the size you set. There is no default size: choose an environment or enter CPU, memory and disk, or the workspace is not created. A workspace needs at least 0.5 CPU and 1 GB of memory (see Volumes and the size you set).
Environments are managed under Environments in the sidebar and are reusable across workspaces. See Custom environments.
Resources
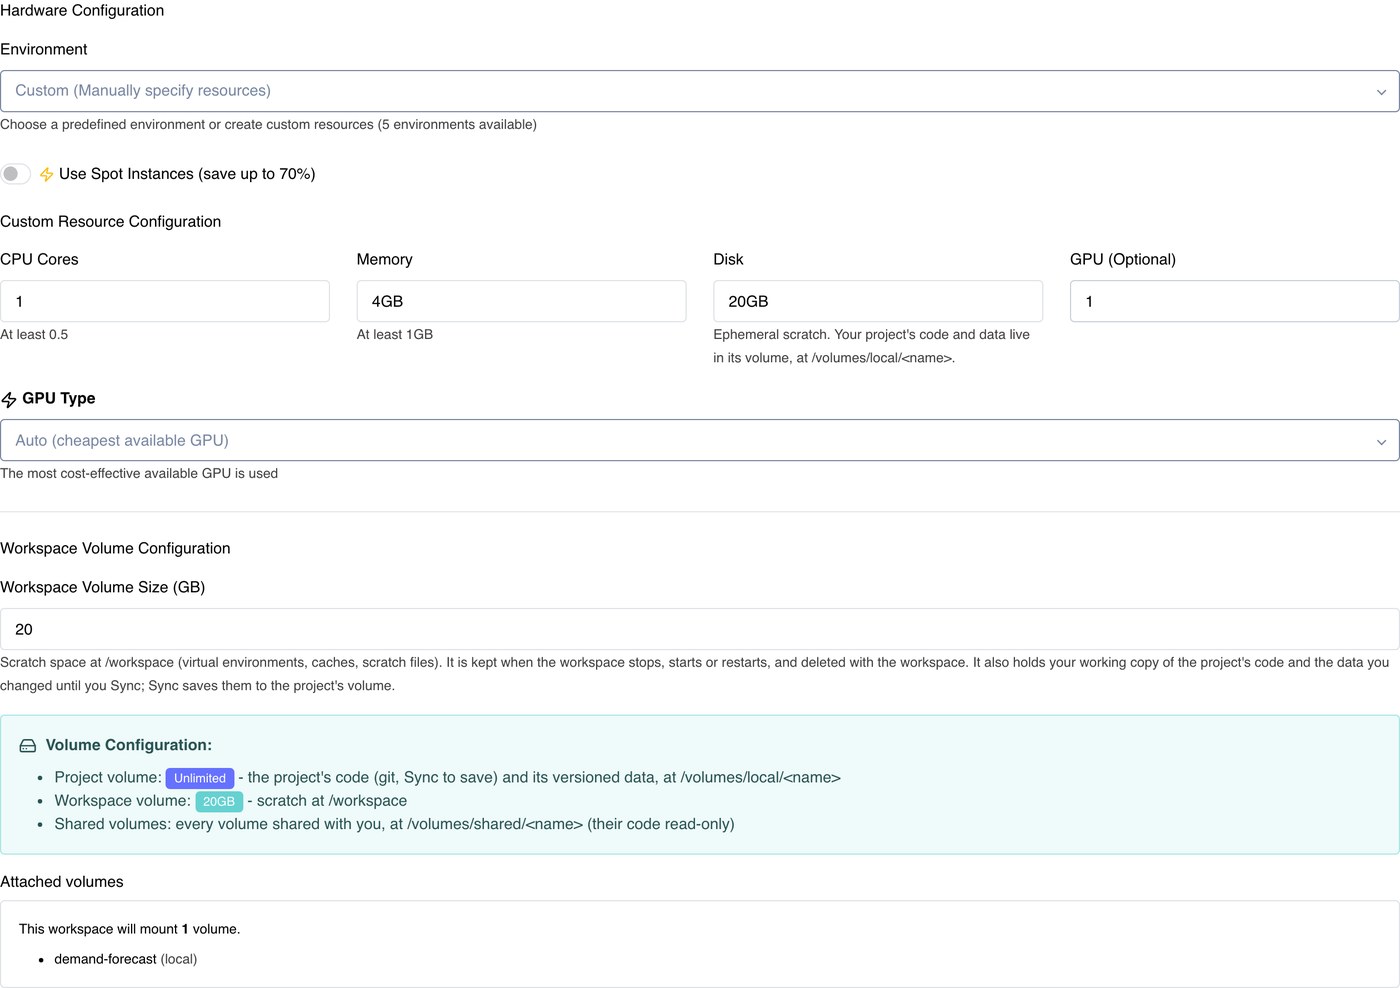
| Setting | Description |
|---|---|
| CPU | Number of vCPUs (for example 1, 2, 4) |
| Memory | RAM (for example 4GB, 8GB, 16GB) |
| GPU | Optional GPU count and GPU type (for example 1 x NVIDIA A10G). Auto takes the most cost-effective GPU available (typically an NVIDIA T4). |
| Disk (ephemeral scratch) | The workspace's temporary scratch disk. Cleared at every stop, start and restart; not the place for anything you want to keep. |
A GPU workspace runs on the platform's GPU machines, which come only in the sizes an administrator allows on the Compute page. The GPU type list offers only the GPU types and counts those machines carry (by default one GPU of T4, L4, A10G, L40S or H100); a count no machine carries shows why, and an administrator can allow larger machines for the AI pool on the Compute page.
These are two different things. Disk is temporary scratch space, cleared at every stop, start and restart. Workspace Volume Size sets your persistent /workspace scratch storage, which keeps its files across stop/start and goes when the workspace is deleted. Put code and data you care about in the project's volume (/volumes/local/<name>/code and data) and Sync; see Volumes.
Volumes and the size you set
The create form's Volumes tab sets Workspace Volume Size, the size of your persistent /workspace scratch volume (virtual environments, caches, scratch files), which survives stop and start; your project's code and data live in its volume, not here.
A workspace mounts its project's volume, always, and only the shared volumes you choose for it. Choose them on the create form's Volumes tab (none is mounted unless chosen; the list above them shows what it will mount), or later with Edit shared volumes on the workspace's Volumes tab, from its next start or restart. A shared volume its owner takes away from you is removed from the workspace and no longer mounted.
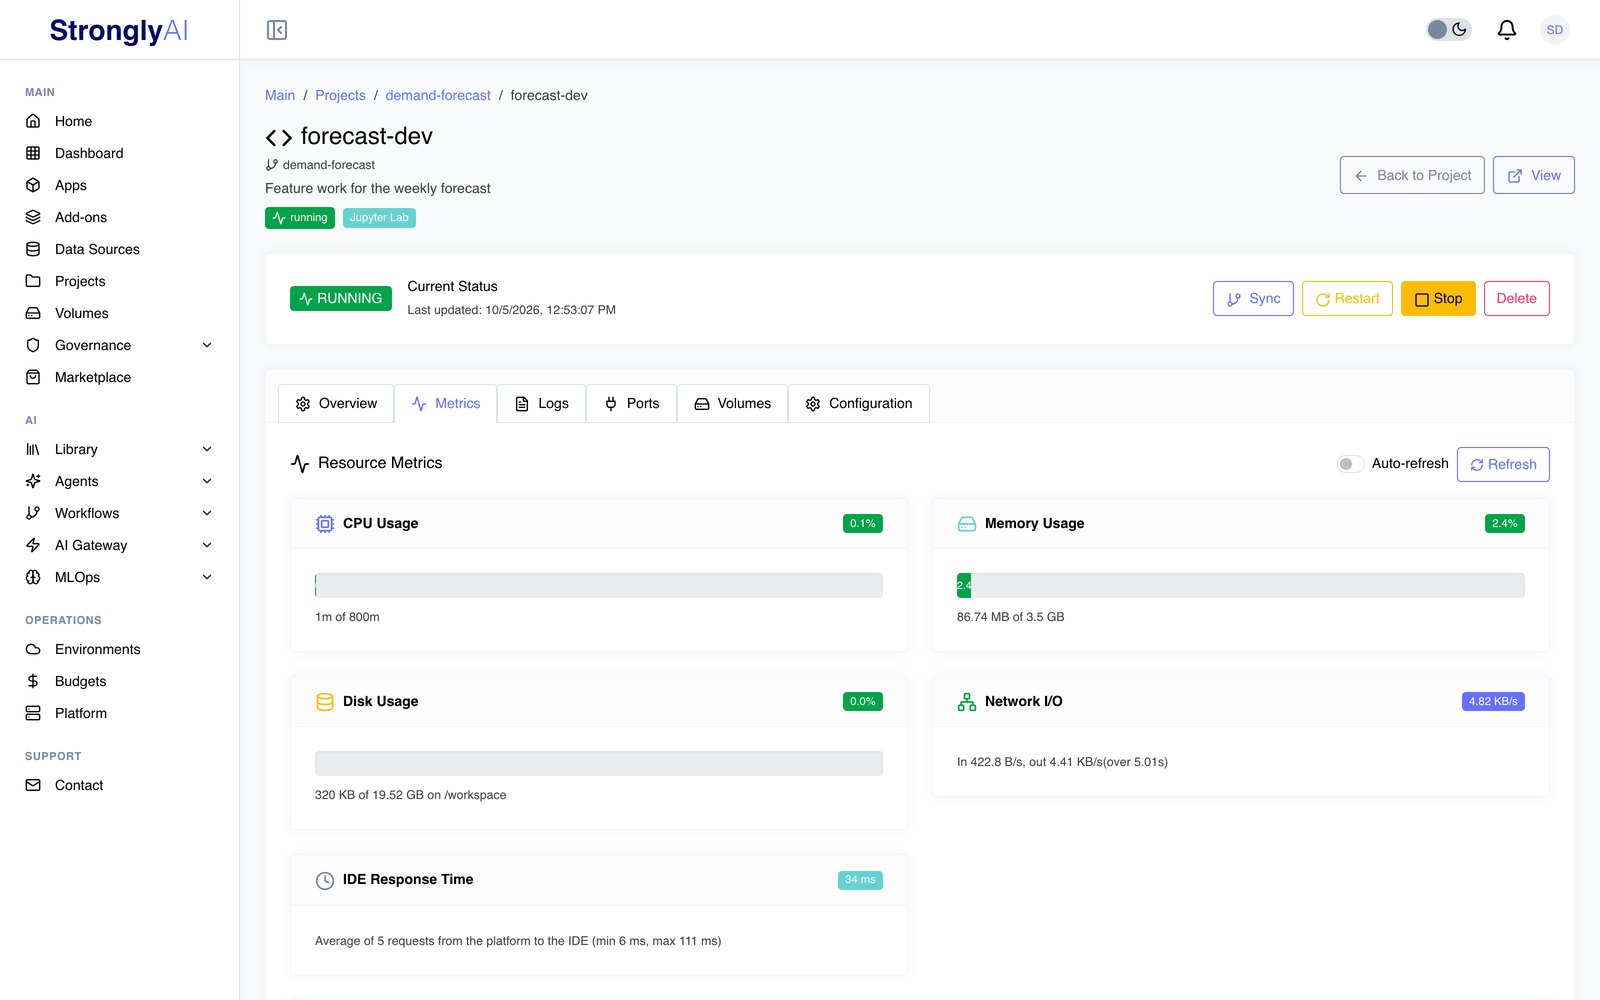
The CPU and memory you set are the whole workspace. Two small platform services run beside your IDE: one keeping all of its mounted volumes in step, however many there are, and one connecting the workspace to the platform. Their share (0.2 CPU and 512 MB) comes out of the size you set, and the IDE gets the rest. For example, a 1 vCPU, 4 GB workspace gives the IDE 0.8 CPU and 3.5 GB. The Metrics tab shows what the IDE has and uses, and lists the platform services with what each takes and uses. A workspace needs at least 0.5 CPU and 1 GB of memory: the platform services' share plus room for the IDE. The form shows the minimum under CPU and Memory and will not create a smaller workspace. A smaller workspace created another way (for example over the API) does not start: Start says it is below the minimum.
Spot instances
Turn on Use Spot Instances to run the workspace on spot capacity, which is significantly cheaper. You are asked to confirm, because spot machines can be reclaimed at short notice: the workspace then restarts on another machine, and running processes and anything held only in memory are lost. Use spot for interruptible, restartable work (experiments, batch exploration) rather than a long unattended run you can't afford to lose. Your files on /workspace and your project and shared volumes are unaffected. A spot workspace runs on the platform's shared capacity rather than on the machines reserved for workspaces. Once it is on, Fall back to on-demand when spot capacity is unavailable (checked by default) runs it on on-demand capacity when no spot is available; unchecked, it waits for spot. See Spot Instances.
Services
Attach platform services during creation and they are wired into the workspace for you, injected as environment variables your code can read:
| Service | What it connects |
|---|---|
| Data Sources | External databases and stores you've configured |
| Add-ons | Managed databases such as PostgreSQL, MongoDB, or Redis |
| AI Models | Model endpoints from the AI Gateway (OpenAI, Anthropic, self-hosted, and more) |
| ML Models | Models from your model registry that are running, or deployed on demand (they start on the first call), each with the address that returns its predictions |
| Workflows | Deployed workflows with a REST API or webhook trigger that you can call from the workspace |
| Feature Stores | Feature stores you can read features from |
| Agents | Deployed agents (streaming workflows) you can talk to |
Each picker lists only what you have access to, with a search box; one you have none of says so. Selected services appear in the workspace's STRONGLY_SERVICES environment variable (and data sources in STRONGLY_DATA_SOURCES), so notebooks and scripts can use them without you pasting connection details. Each selected add-on and data source also gets its Python client installed when the workspace starts (for example psycopg2-binary and psycopg for PostgreSQL, pymongo for MongoDB, snowflake-connector-python for Snowflake), so import psycopg2 works without a pip install. A service added later is wired in, and its client installed, at the next start or restart. Jupyter Lab and VS Code workspaces also come with numpy, pandas, scipy, scikit-learn, xgboost, matplotlib, pyarrow and the Ray, Dask and Spark clients already installed.
Environment variables
Every workspace has STRONGLY_API_URL, the platform API's address from inside the workspace. Calls to $STRONGLY_API_URL/api/v1/... from the workspace are signed in as you automatically, so they need no API key. For example, curl "$STRONGLY_API_URL/api/v1/apps" lists your apps. STRONGLY_API_URL is an address inside the platform, so a link you open in your browser uses STRONGLY_BASE_URL, the platform's public address, instead: for example $STRONGLY_BASE_URL/api/workspace-proxy/$STRONGLY_WORKSPACE_ID/port/3000/ opens the app on port 3000.
Add your own key/value environment variables for non-secret configuration your code reads at runtime, for example DATA_PATH=/volumes/local/my-project/data or EPOCHS=10.
Coding assistants
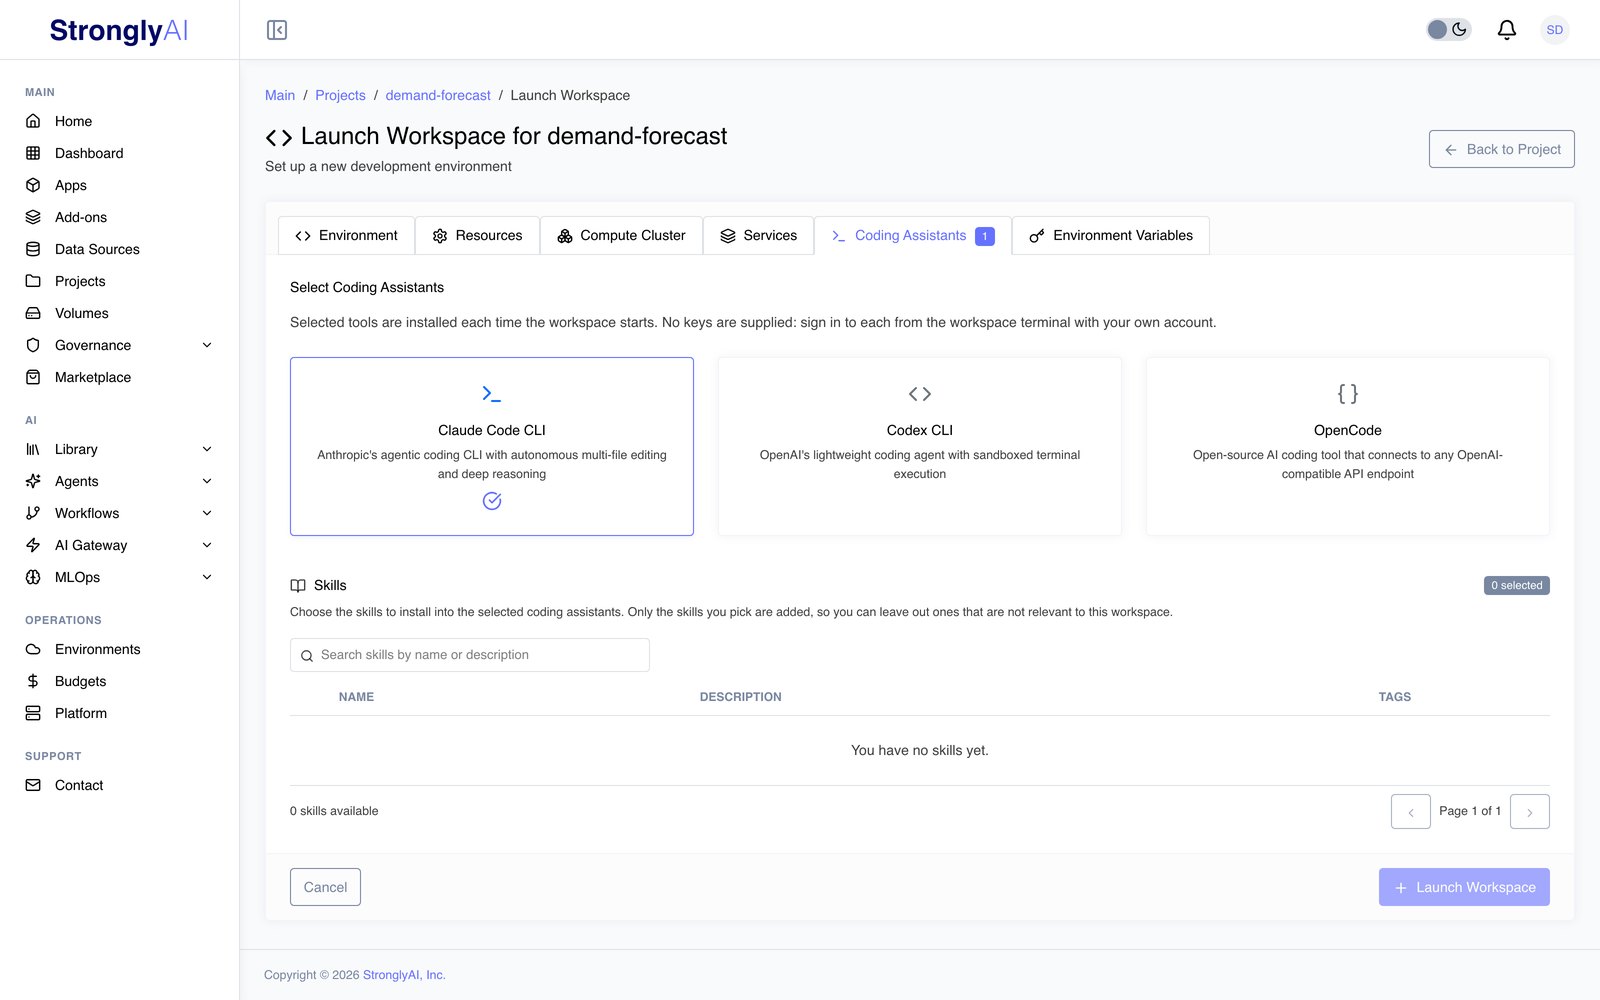
Optionally install one command-line coding assistant at startup, so it's ready in the workspace terminal. A workspace has one assistant: selecting another replaces it, and clicking the selected one again clears it.
- Claude Code CLI
- Codex CLI
- OpenCode
These are available for Jupyter Lab and VS Code. They are installed every time the workspace starts, before the IDE opens, and are on the PATH of every terminal you open. They need Node.js 22 or newer: if the environment's image has an older Node.js or none, Node.js 22 is installed first. If an assistant cannot be installed (for example the workspace cannot download Node.js), the workspace does not start and its error says which assistant and why, rather than starting without it. No API keys are supplied: sign in to each assistant from the workspace terminal with your own account.
Every Jupyter Lab and VS Code workspace gets the Strongly skill, which teaches an assistant how to work with the platform (deploying apps, add-ons, agents, workflows and the rest), so it can act on the platform from the workspace. You can also choose which of your own skills from the Skill Library to add; only the skills you pick are added. Both are installed for Claude Code, Codex and OpenCode whether or not you select an assistant, so one you install or sign in to yourself later has them too. A chosen skill that cannot be installed (deleted, or no longer shared with you) stops the start with the reason. Change the assistant and skills later in the Coding assistant card on the Configuration tab; a change applies at the next start or restart. See Coding Assistants for signing in, where the skills are, and working with an assistant in the workspace.
Compute cluster
For work that outgrows a single machine, attach a distributed Ray, Dask, or Spark cluster to the workspace. It's reachable directly from your notebook and is sized by you. See the dedicated Compute Clusters guide.
The workspace details page
Open a workspace from the project page to see its details, organized into tabs:
| Tab | Shows |
|---|---|
| Overview | Name, description, IDE, status, and the size: the environment (or Custom for your own size), CPU, memory, disk, GPU, the workspace volume, and each platform container with its share. If the workspace failed to start, the reason is shown at the top of the page |
| Metrics | Live CPU, memory, disk, network, GPU, and IDE response time while the workspace runs, plus the two platform services running beside your IDE (the one keeping its volumes in step, and its connection to the platform) with what each takes and uses. If a measurement fails, the tab shows the error instead of numbers |
| Logs | Build, Deployment and Runtime logs. Runtime is the IDE container's log since it started, setup steps included. It opens on the newest 100 lines; scroll to the top of the log to load the 100 before them, as far back as the log goes ("Start of the log" marks its first line). Search filters the lines loaded, Auto-refresh keeps them current (it turns on by itself while the workspace starts, so the start is shown as it goes: what the workspace waits on, then each setup step), and Download saves the lines loaded |
| Ports | Open any app running inside the workspace by its port (see below) |
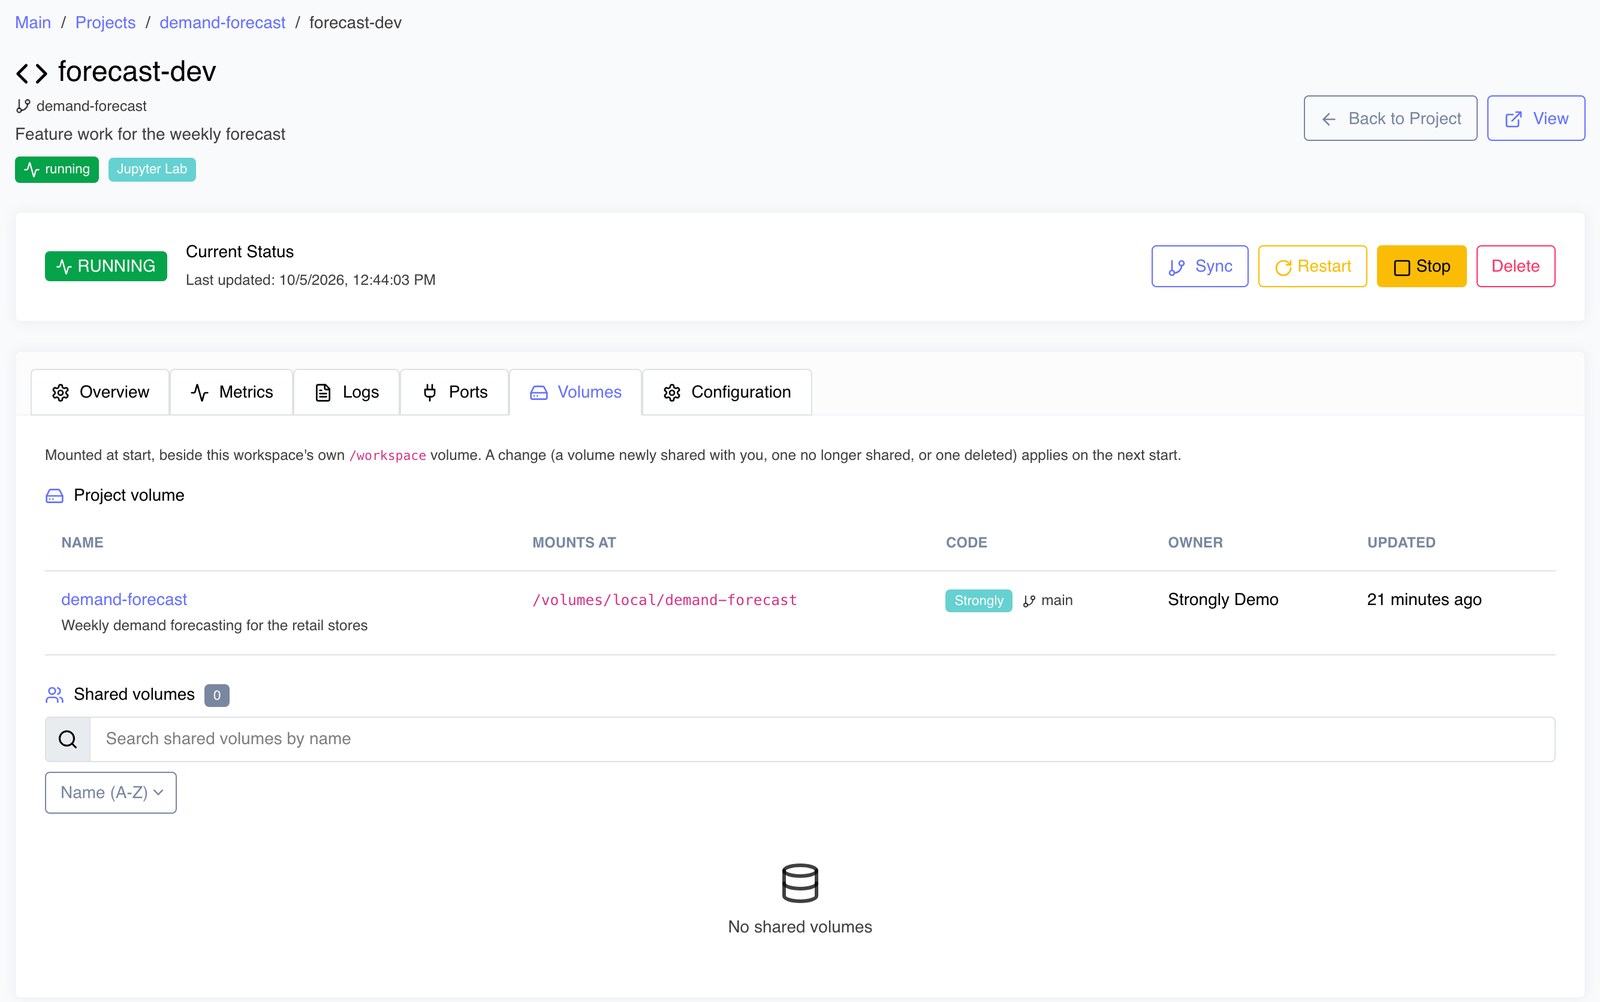
| Volumes | The volumes this workspace mounts and where: the project volume (with its filesystem and branch) and the shared volumes chosen for it, with their owner and your access. Edit shared volumes changes the choice, from the next start or restart |
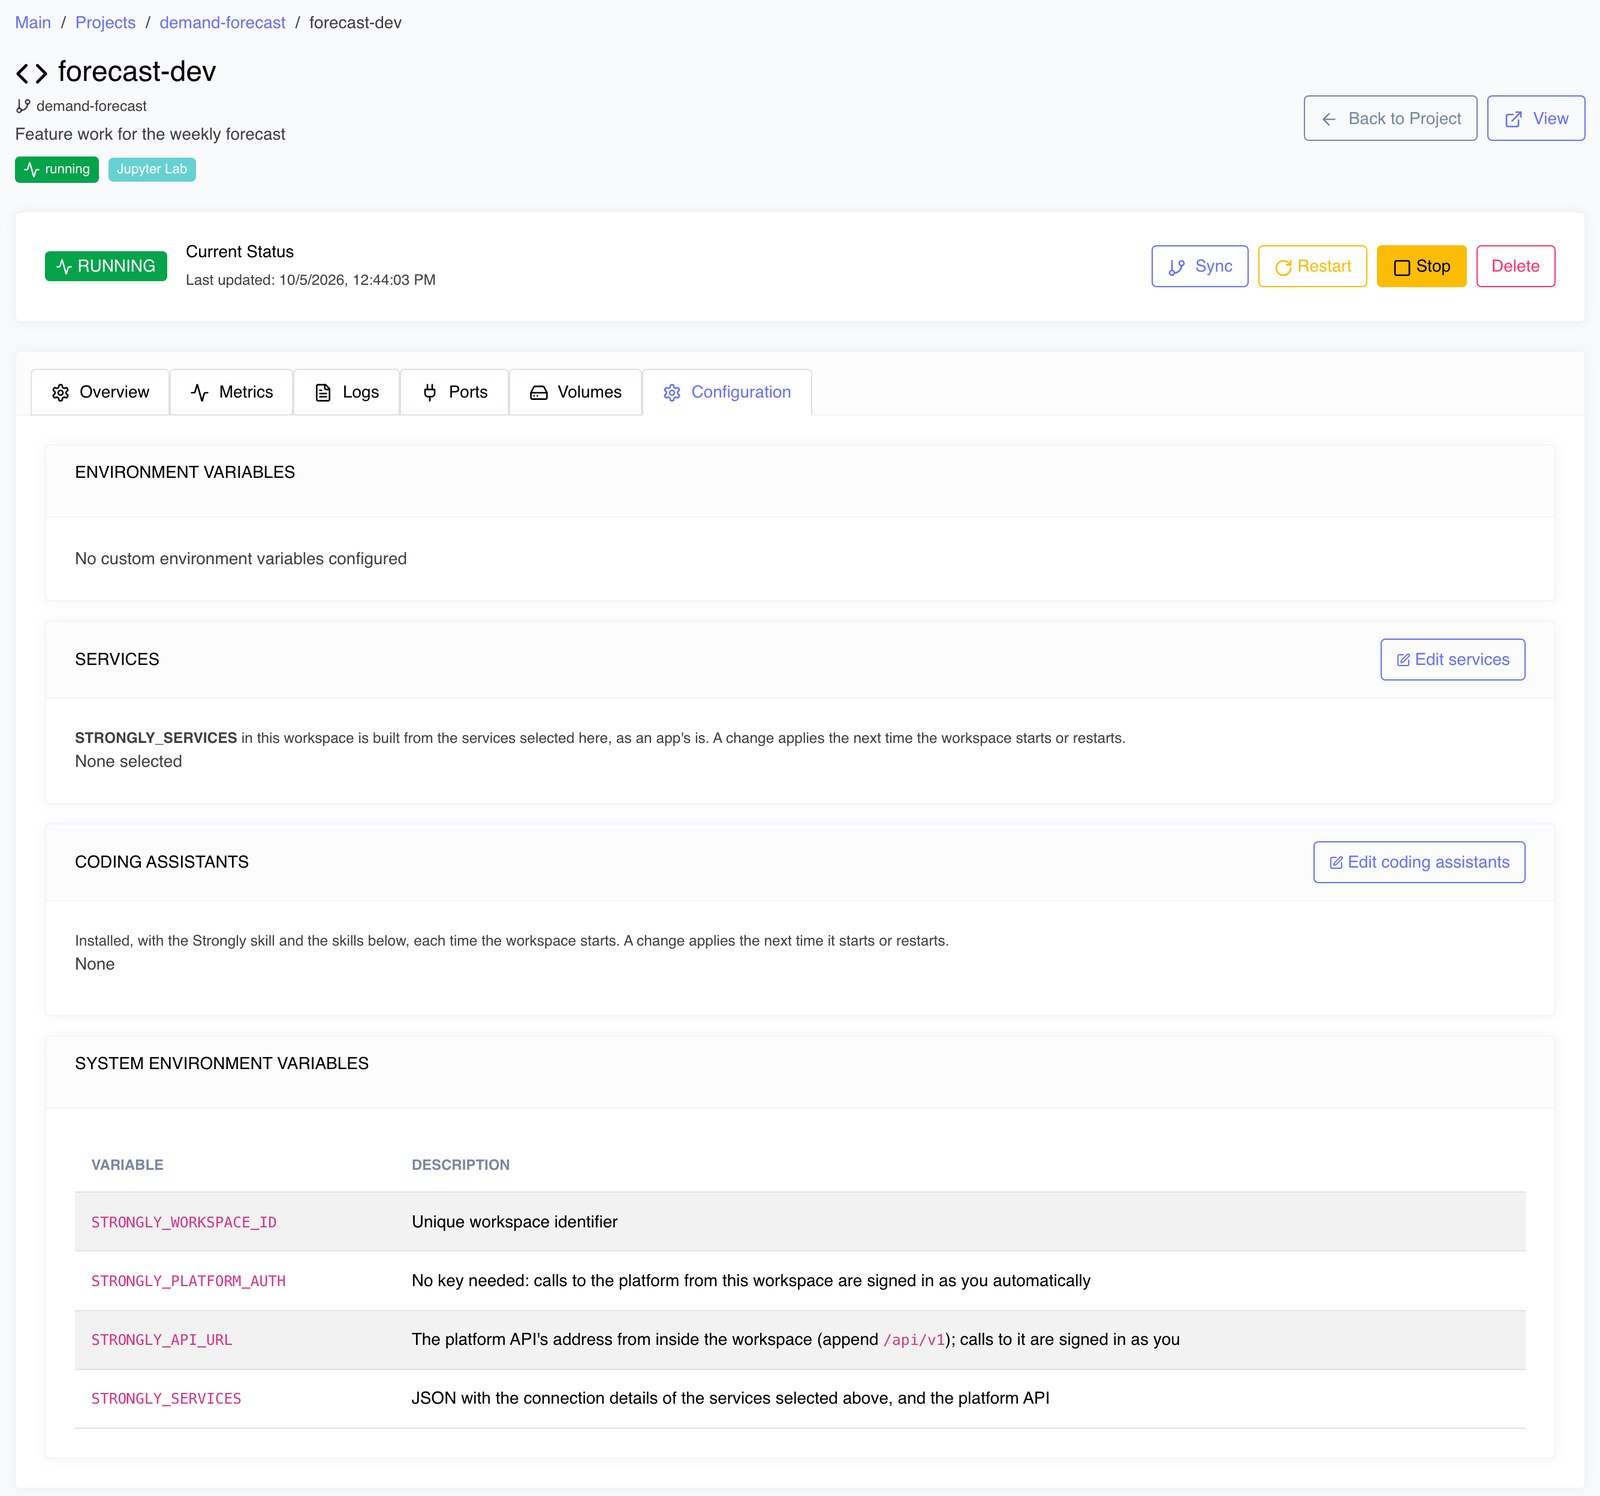
| Configuration | The workspace's environment variables, services (Edit services) and coding assistants with their skills (Edit coding assistants), each change applied from the next start or restart, and the variables the platform sets in every workspace |
| Cluster | Present when a compute cluster is attached; shows cluster status and, when enabled, the dashboard and metrics |
From the top of the page you can Start, Stop, Restart, Sync and Delete the workspace, and View the IDE when it's running.
The Volumes tab lists what the workspace mounts and where:
The Configuration tab holds its environment variables, services and coding assistants, and the variables the platform sets:
Accessing running apps by port
Run any app inside a workspace (a Streamlit or Gradio dashboard, an API server, a dev server) and open it in your browser by its port. There's no setup step and no fixed port: whatever port your app listens on, open the workspace Ports tab, enter that port, and click Open. Several apps can run at once and be opened independently.
Your app must listen on all interfaces (0.0.0.0), which is standard for a container. See Workspace Port Access for the step-by-step guide, per-framework commands, the port URL, and how to call one app from another.
Deploying an app you built in a workspace
An app you write in a workspace deploys to Apps straight from its volume, with nothing to upload:
- Put the app in a folder of the project's code (for example
/volumes/local/<project>/code/my-app), with astrongly.manifest.yamlat the top of that folder. The app must listen on the port in thePORTenvironment variable, which the platform sets; see Building apps. - Click Sync, on the workspace page or in the IDE's top bar. Sync commits and pushes your code to the volume, and says what it did.
- In Apps, click Deploy App, choose the Volume source, pick the project's volume, and enter the folder (
my-app). If the app reads the project's data, also click Volumes (with the services), pick the project's volume, and give the app a disk (choose Custom Configuration under Environment and set Disk Space, or an environment with a disk; Small, Medium and Large have none): the build takes only the code, and an app gets a volume'sdata/only when the volume is picked there (a volume is kept on the app's disk, so one picked without a disk is refused). Set the size and click Deploy App.
For a new version later, change the code, Sync again, and on the app's Versions tab click Build & deploy new version with the Volume source. See Deploying apps.
Lifecycle
Created --> Starting --> Running --> Stopping --> Stopped
- Start launches the workspace. The button returns as soon as the start is accepted and the status shows Starting while the workspace comes up (the first start also deploys it). When the IDE is reachable the status changes to Running and View appears on its own, with no need to refresh; if it cannot start, the status changes to Error; check the Logs tab, then press Start again to redeploy it.
- Stop shuts the workspace down and keeps everything in it: your
/workspacescratch volume, and the code and data you changed but have not synced (uncommitted edits, local commits and the branch you are on included). Starting it again brings it all back. If a compute cluster is attached, it's removed on stop (so it costs nothing while stopped) and recreated on start. - Restart stops and starts the workspace in one step and keeps the same things a stop does. Use it after changing the workspace's configuration, or to recover an IDE that stopped responding.
- Restart needed: after a platform update a running workspace keeps running on the previous version (restarting it for you would end your open notebooks and terminals). It shows Restart needed in the workspace lists and a warning on its page; restart it when it suits you to apply the update. See Platform Updates.
- Sync saves your work to the durable volume in one click: it commits and pushes your
code/(git) and records new versions of the data files you changed, for every volume attached to the workspace (available while it's running). Sync before you delete the workspace or hand work off: until then your changes are only in this workspace -- see When to sync. If a volume could not be pushed, Sync says which and why: a conflict means someone else changed the same lines on the volume since you last synced: nothing is overwritten, and you decide each file on the workspace page or merge it by hand in the IDE, then sync again (see When someone else changed the same lines); not pushed gives the reason. If your changes were saved but the workspace'sdata/could not be brought up to the volume's latest versions, Sync says so with the reason; restart the workspace to see them. Only the project volume's code is pushed: a shared volume's code is read-only. A volume nobody has committed to yet has nothing to sync. - Delete removes the workspace and its
/workspacevolume permanently; the confirmation says so. Your project and shared volumes are not deleted -- their synced code and data live on. But anything you changed in the workspace and did not sync is lost, so Sync first if you want to keep it. Any attached compute cluster is removed with the workspace.
Stopping on a schedule
A workspace runs until you stop it; closing your browser does not stop it, and there is no idle timeout. A running workspace is billed until it stops, a GPU workspace (the costliest) included, so stop one you are not using. To stop and start workspaces on a timetable (for example every evening and weekend), create a FinOps schedule.
Multiple workspaces per project
A project can run several workspaces at once. Each has its own IDE, its own resources, its own /workspace scratch volume and its own copy of the project's code, and all of them read the same project data. Starting or stopping one doesn't affect the others.
Who can use a workspace
A workspace is private to the person who created it: only they can open or start it. The project's owner and platform administrators can see, stop and delete it (to manage cost and clean up) but never open it. Editors on the project create their own workspaces; viewers cannot create one. See Who can do what to a workspace.
GitHub projects
In a project whose filesystem is GitHub, the project volume's code/ is a clone of the repository, made with your own SSH key (one GitHub accepts for the repository, under Profile > Integrations) when the workspace starts. Sync pushes your commits to GitHub. The key is never placed in the IDE. See GitHub projects.
Persisting packages
System-level installs (pip install, apt-get install, R package installs into the system library) do not survive a restart, because the container is recreated. To keep packages, install them into your persistent /workspace volume:
# Python: create a virtual environment on /workspace
python -m venv /workspace/venv
source /workspace/venv/bin/activate
pip install your-packages
# R: install into a library folder on /workspace, and point R at it
dir.create("/workspace/rlibs", showWarnings = FALSE)
install.packages("data.table", lib = "/workspace/rlibs")
.libPaths("/workspace/rlibs")
Managing workspaces over the API
Everything you can do in the UI is available over the REST API and Python SDK, including create (with IDE, resources, services, spot, custom environments, and clusters), start/stop/restart, status, metrics, logs, sync, and running a command inside the workspace. See the Workspaces API reference and the Python SDK's workspaces.